This educational blog is created to guide students to obtain the Comptuter A+ Technician Certification and the Internet and Computing Core Certification (IC3). Also, this blog shows some students' projects and the instruction how to complete the projects. If you have any questions please contact Pan Cheng at pchengeducation@hotmail.com

Tuesday, May 26, 2009

Excel Project (Building your dream bedroom for period 8)

1) Use Microsoft Excel to list the items that you need to build your dream bedroom.
2) Create a poster demonstrating your dream bedroom
For example: bed, windows, chairs, tables, clock...

The first row in the excel should be (with an example):

First Row:
Item Name Quantity $ per one Total Price Where to buy Description

Second Row:
Bed 1 400 400 Home Depot Red, long bed

Requirements:
1) At lease 15 items are listed in your Excel
2) AutoFormat is applied in your Excel
3) Addition Formula is applied in your Excel
4) AutoSum is applied in your Excel
5) The format of poster is title, picture, and description

Samples:


Computer Skills:

Entering a Formula in a Cell:
1. Select the cell in which you want to enter the formula.
2. Type an equal sign = to activate the Formula Window and type the formula if you already know it. In the figure above, a formula for the sum of Field1 and Field2 is created as Field3.
3. After this formula is typed in and is pressed, the result is immediately shown in Field3.


To Create a overall Total:
1. Click AutoSum 
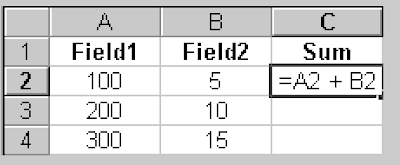
and select the cell where you want to insert the sum and, Excel's default formula is sum.
2. Press ENTER.

Saturday, May 23, 2009

Online Excel Tutorials

Go to http://spreadsheets.about.com/od/excel101/ss/080610basic2003.htm and complete the Basic Excel 2003 Spreadsheet Tutorial.

Go to http://spreadsheets.about.com/od/excelformulas/ss/formula_begin.htm and complete the Excel Formulas Step by Step Tutorial.


Go to http://spreadsheets.about.com/od/excelfunctions/ss/sum_autosum.htm and complete the Sum and AutoSum Step and Step Tutorial.


Go to http://spreadsheets.about.com/od/excelfunctions/ss/if_function_sbs.htm and complete the Excel IF Function Step by Step Tutorial.

Go to http://spreadsheets.about.com/od/excelcharts/ss/bar_graph_2.htm and complete the Excel 2003 Bar Graph Chart Tutorial.


Go to http://spreadsheets.about.com/od/excelcharts/ss/pictograph_2.htm and complete Create a Pictograph in Excel 2003


Question: How many kinds of chart are available in Excel?

Go to http://spreadsheets.about.com/od/datamanagementinexcel/ss/create_list_2.htm and complete the How to Create List in Excel.

Go to http://spreadsheets.about.com/od/excelfunctions/ss/vlookup.htm and complete the Using the Excel VLOOKUP Function.

Go to http://spreadsheets.about.com/od/excelfunctions/ss/hlookup.htm and complete the Using the Excel HLOOKUP Function.

Question: What is the difference between VLOOKUP and HLOOKUP?


(Extra credit / Optional / Very hard) Go to Excel Macro and complete the Introduction to using macro in Microsoft Excel.

Thursday, May 21, 2009

Excel Project: Should I play video games in the class?

Step 1: Input the following data to Excel (look at the Excel Sample)


Excel Sample

Tuesday, May 19, 2009

Completing Excel Handouts

1) Complete the Excel Worksheet handout by using the following pictures.
2) Use Google to search the definitions.


Picture 1.


Picture 2.


Thursday, May 7, 2009

Excel Project (Creating your own business)

What is your dream? Have you dreamed to own your car store in Brooklyn? Have you dreamed to own your flower store in Manhattan?
Now is the time to plan for your dream!


Project Requirements for each student:
1) Write down your dream and a brief description about your dream in your notebook (Some dream suggestions include: owning your game studio (or company), managing the technology department, and owning your business company)
2) Use Excel to list the items, services, or resources that you need for achieving your dream
3) Create a poster and a brochure demonstrating your company 4) You should have your own company logo in your poster and brochure

Sample:


Monday, May 4, 2009

Creating Mother's Day presentation using PowerPoint

Key Terms:


1) Clip Organizer - a wide variety of pictures, photographs, sounds, and video clips that you can insert in your presentation.

2) Sizing handles - appear on the border of the graphic. You can cut, copy, paste, delete, move, and resize the picture.

3) Slide Master - is an element of the design templates that stores information about the template.

4) Slide transitions determine the changes in the display that occur as you move from one slide to another in Slide Show view.

5) Crop - to trim a graphic

Requirements in your powerpoint presentation:

1) All information is about Mother's Day.

2) At least six slides are showed in your presentation.

3) Correct page arrangement:
Front Page - Title: Mother's Day, Date: May 10,2009
Table of Contents - Information is bulleted.
History
To My Dear Mother
optional title(s)

Conclusion.

4) At least one clip art or picture is animated with entrance on each slide.

5) At least on clip art or picture is animated with motion paths on each slide.

6) Slide transition is applied in your presentation.

7) Updated date, slide numbers, and footer are showed.

8) Save your files as "Last Name" and "Mother's Day" in your period folder.

9) When finishing your presentation, you show your presentation as View Show.

A sample of Mother's Day presentation:


Computer Skills:

Steps to apply Design Template:

Click on File \ New \ Format \ Slide Design \ you will see the Design Template pane on the right side of your screen \ Select the template you like \ Press the Apply button

Steps to apply slide translation:

Click on Slide Show menu bar \ Slide Transition \ you will see a Slide Transition pane on you right side of the screen \ Select the slide transition style you like \ Click on the Apply To All Slides button

Steps to insert Slide Numbers, footer, and updated day and time:

Click on Insert \ Slide Number \ on the Footer and Header dialog box, find and enter Slider Numbers, footer, or Date Time \ Click on the Apply To All button

Steps to animate your clip arts or pictures:

Select the clip art or picture you want to animate \ Click on Slide Show \ Custom Animation \ Click on the Add Effect button \ Select the button Entrance, Emphasis, Exit, or Motion Paths for animating your clip art or picture \

Steps to view your slide show:

Click on View \ Slide Show

Steps to insert AutoShapes such as smile face, square, or rectangle:

Click on Insert \ Picture \ AutoShapes \ Select Basic Shapes icon on the AutoShapes Toolbar \ Select the shape you like \ Move your mouse to your PowerPoint \ Drag and draw the shape

Steps to insert movie or sound:

Click on Insert \ Sound and Movies \...

Excellent Students' Mother's Day PowerPoint presenations


Excellent Students' Mother's Day PowerPoint presenations 2


Spread Firefox Affiliate Button